Wednesday, March 31, 2010

March 31st - Savoy Cabbage & Radicchio Slaw with Blood Orange Dressing

Happy Birthday Nathan!!
My little nephew turns 7 today! That was the age I was in 1985  (see yesterday's post) thinking about this year's birthday, which is tomorrow.  Yes, I'm an April Fool's Baby.  No, the doctor didn't say to my mom that I was a girl and then April Fools.  I think I've heard them all.

Symposium Cakes
So, every year the culinary school has a symposium which is basically a day of workshops and lectures dealing with all things culinary related based on the theme for the year.  This year's theme happened to be Chicago: Past, Present, and Future.  Along with other duties, they put me in charge of organizing the cake competition this year.  I decided, to make it really easy on everyone, to do styrofoam cakes with fondant.  The challenge for the students was to keep within the theme (Chicago: My Kind of Town) and to make sure that everything on their cake was edible (no wood, metal, plastic, etc.)  They worked in teams of two and we had 12 entries.  I am really proud of all of them because this was their first time working with fondant (which is not easy to work with). 

So here are the cakes.  Again, THESE ARE NOT MY CAKES!
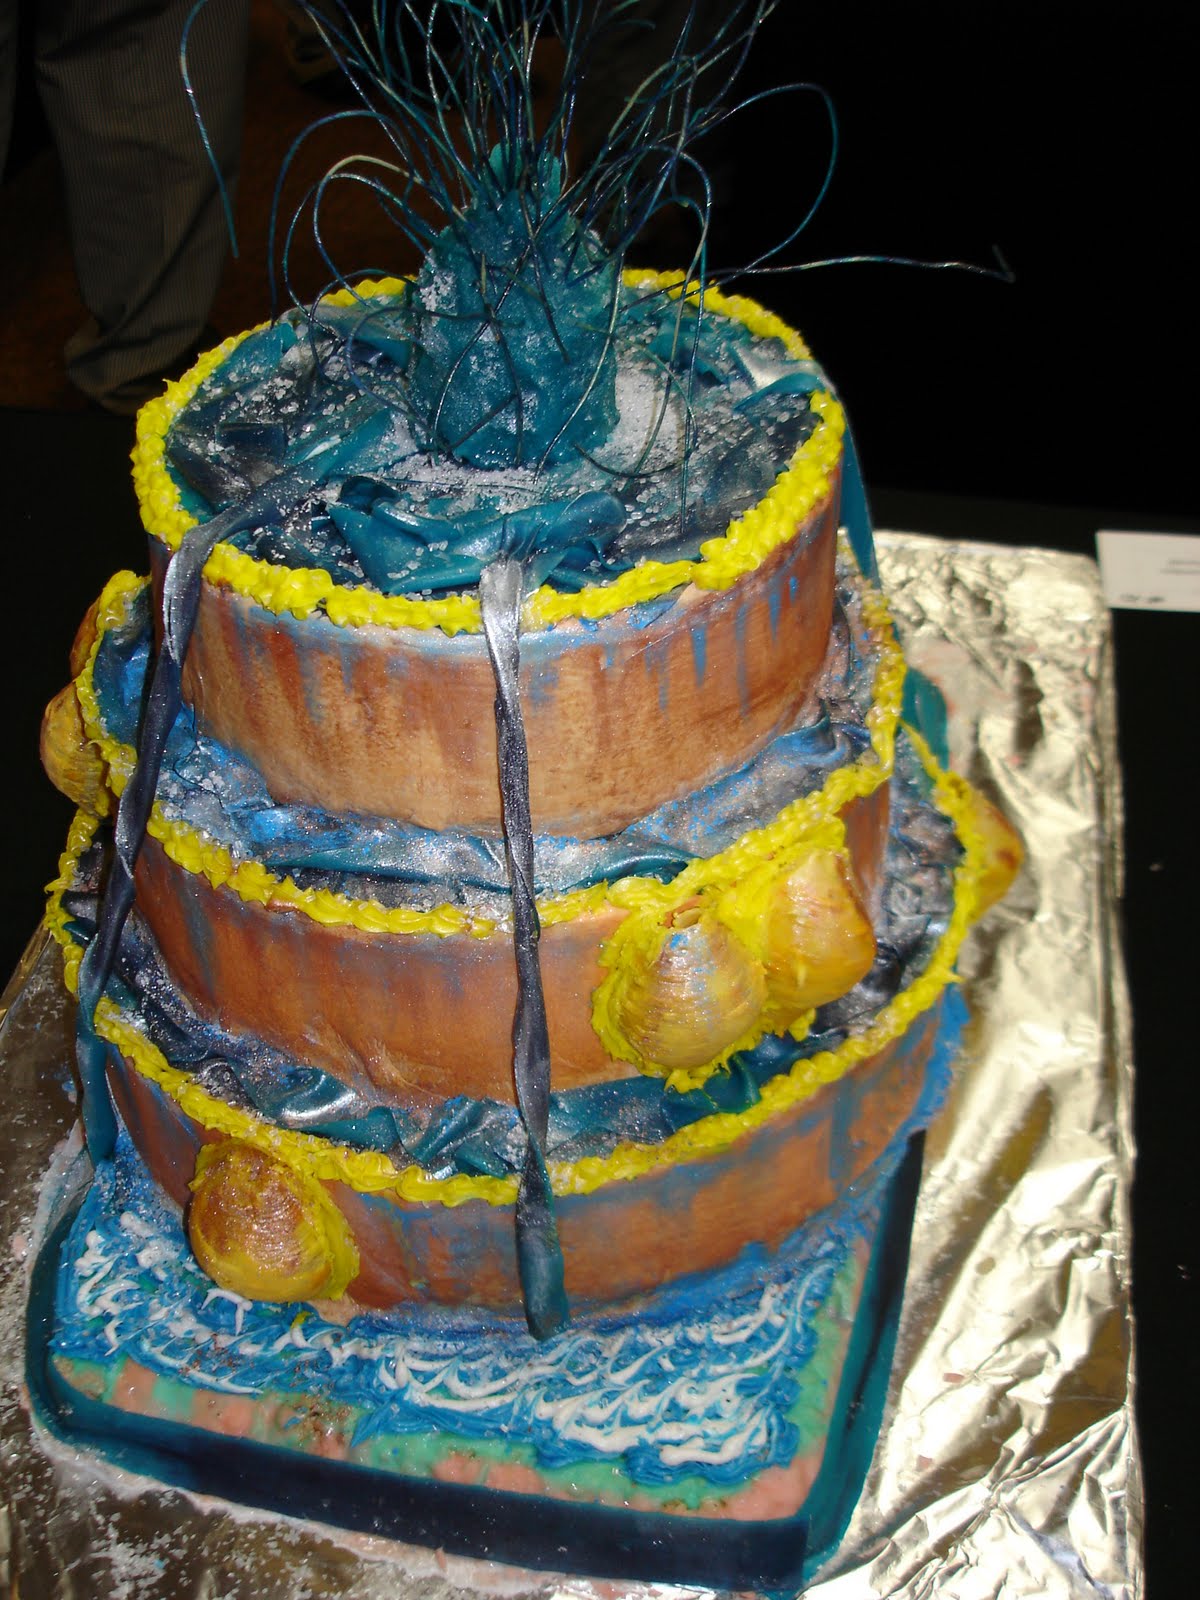
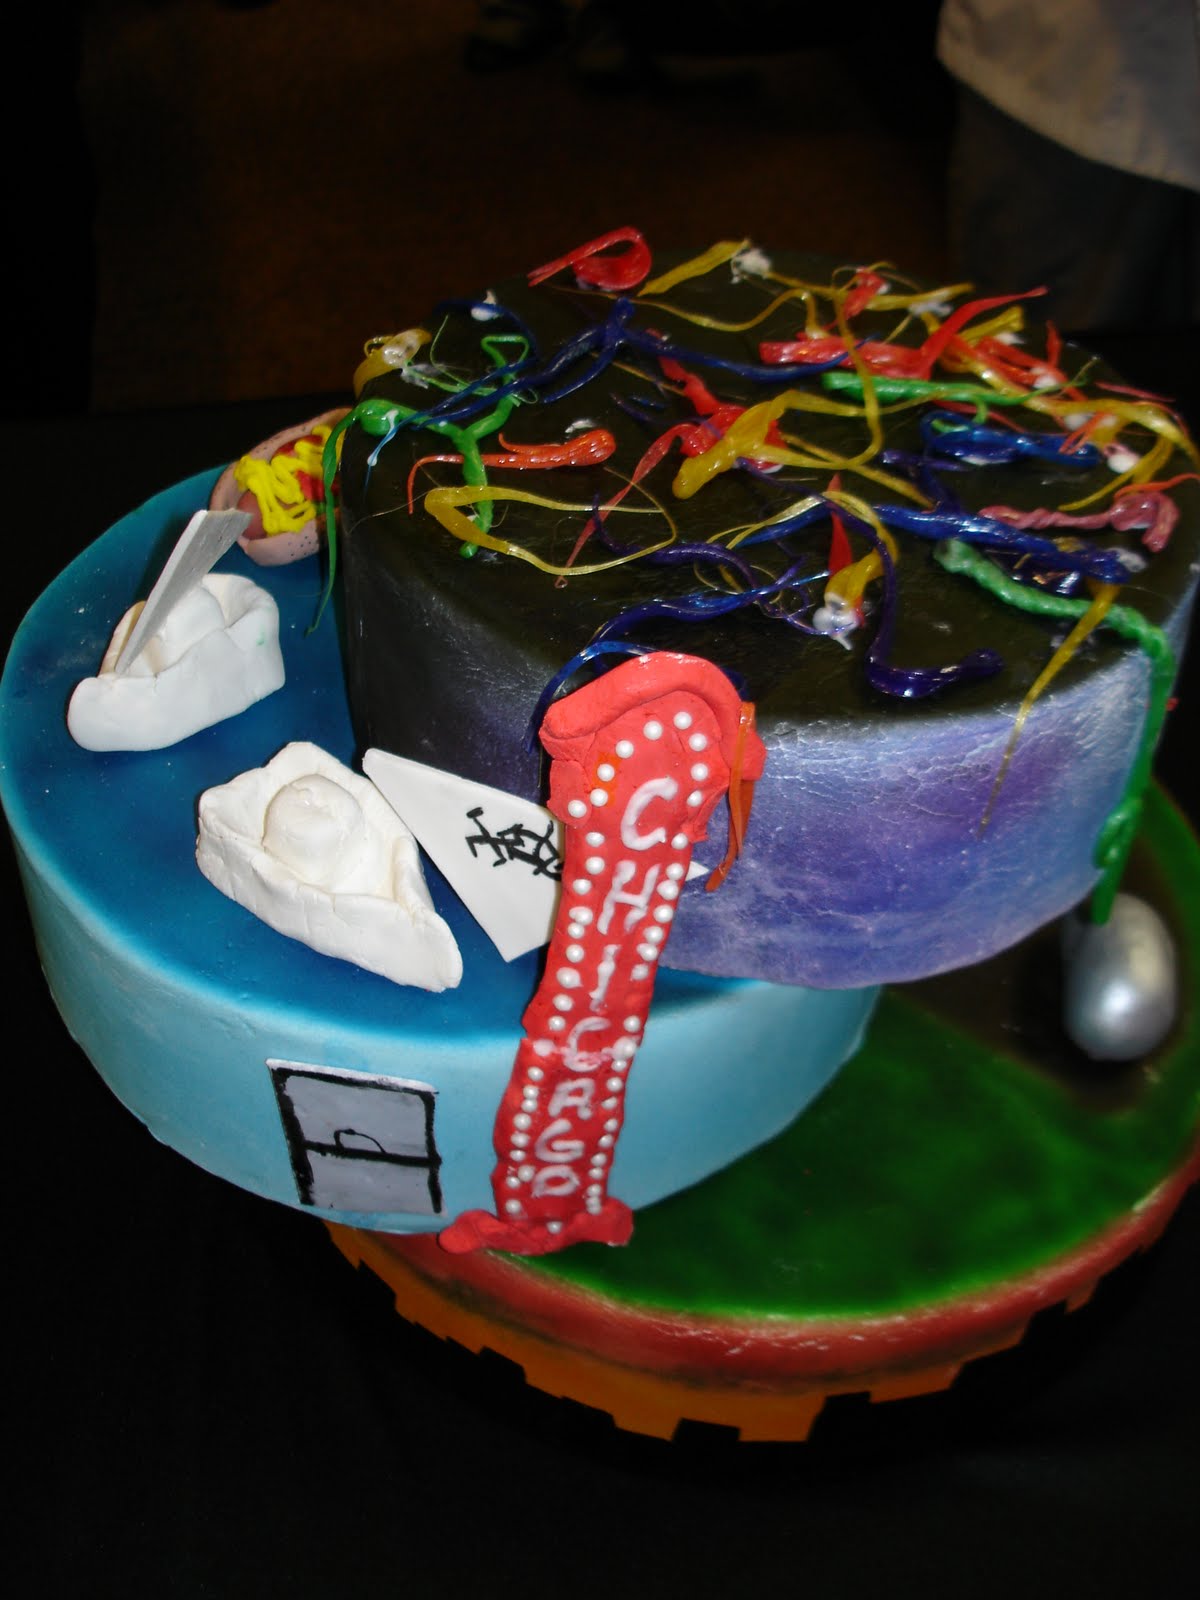

3RD PLACE


2nd Place

1ST PLACE
Now folks, I did not judge so please don't send me comments about why this one won and this one didn't.  I had nothing to do with it.  They were judged on technical marks as well as artistic.  Anyway, those are the cakes.  Not too shabby.

THE RECIPE

Ingredients:

Orange juice: $1.89
Rice Vinegar: had
Honey: had
Olive oil: had
Mayonnaise: had
Shallot: $0.99
Savoy Cabbage: $1.10
Raddichio: $2.29

Total: $6.27

I could not, for the life of me, find blood orange juice.  So, I did the substitution (supplied by the recipe) of mixing orange juice with pomegranate juice. (I don't see the vibrant color.)  Also, good luck finding radicchio.  I searched for it for 2 hours at all my local grocery stores.  Nothing.  Finally, I just happened  upon it by chance in my quest for lamb (which is tomorrow). 

Was the effort worth it?  Meh.  Its a very different slaw recipe which would be good for the upcoming summer picnic season, but it needs to be tweeked.  To me, I think it needs more vinegar or acid (lemon juice).  I don't think it's sour enough.  The pomegranate/orange juice is ridiculous..it adds nothing.  I should have saved some money and used cranberry juice instead. 

THE RESULTS

FAST:  It's pretty quick.  It took maybe 15 to get everything chopped and mixed.   I, however, would let it sit in the fridge for a good hour to let the flavors marry before serving it.

EASY:  Chopping up the cabbage and radicchio could be a little challenging.  Just make sure to take off any outer leaves that look brown, cut the heads in half, and cut out the core.  Then, you can start slicing it into thin slices.  If you find your dressing is a little chunky, take a immersion blender to it (if you have one) or put it in the blender.  It will help thicken and emulsify the dressing. 

FRESH:  Yes.  It is really fresh tasting, but it could use a little grated orange zest to boost the orange flavor.

OVERALL:  This recipe is okay.  I'd have to play with it a little more before serving it to anyone.  I think a little orange or lemon zest would help boost up the flavor along with a little more rice vinegar.  Maybe a splash of soy to play up the asian characteristics of the slaw?

Tomrrow is my birf-day!  I'm so looking forward to it and making the lamb recipe.  I think I've only made lamb at home one other time (and that was lamb chops).  Exciting!  See ya tomorrow!

Tuesday, March 30, 2010

March 30th - Chicken with Carrots Prunes and Rice

I'M BACK...AND READY TO GO!
Well, after a much needed few days off, I'm back and feeling much better.  I've got some pep in my step and ready to take on anything (well, not anything...most anything).   Why in such good spirits you ask?  Well, it's my BIRTHDAY WEEK!!  Happy Birthday Week to Me!  I can't believe this birthday has finally come.  I remember when I was little (back in 1985) and thought, "Gosh in 2010 not only will we have flying cars, but I'm going to be 32 years old.  That's OLD!"  Every birthday since 1985, I've thought of that.  Well it's here and unfortunately, NO flying cars.  But I think back on everything I've wanted to do since I was little, and I've pretty much accomplished most of it:

1.  BECAME A CHEF
2.  LIVED IN ITALY FOR A WHILE
3.  OWN MY OWN CAR SO I CAN PLAY WHATEVER MUSIC I WANT
4.  FOUND A PERFECT MATE
5.  OWN MY OWN HOUSE SO I CAN LEAVE CLOTHES ON THE FLOOR
6.  BECAME A TEACHER
7.  TRAVELED TO SPAIN
8.  LIVE IN A BIG CITY

Now I just need to get a dog and a pickup truck and I think all of my childhood wishes will finally come true.

THE RECIPE

Ingredients:

Chicken: $4.59
Olive oil: had
Onion: had
Carrots: $0.66
Rice: had
Prunes: $2.29
Paprika: had
Chicken broth: $2.19

Total:  $9.73

I have to be honest and tell you that I added 2 sticks of cinnamon and a bay leaf to this recipe.  I just didn't think the recipe (the way it was) would be flavorful enough.  I just lectured about North African/Morroccan cuisine to my class about 2 weeks ago and I remember a similar recipe like this but it had cinnamon sticks, bay leaf, clove, and saffron.  I only added the cinnamon and bay leaf to stay semi-true to the recipe.  I'm kind of glad I did.

Also, 1 hour in the oven is WAY too long.  The rice got over done and mushy.  I knew I should have trusted my instincts and checked the thing at 45 minutes.  I didn't and UGH!  It's like eating mashed potatoes. 

THE RESULTS

FAST:  Not really.  I didn't feel like dragging out my food processor from the garage, so I hand grated the carrots.  That took a while (10 min), plus this thing needs to cook for at least 45 minutes (MAKE SURE YOU CHECK IT).  So you're looking at least an hour before its done.

EASY:  Grating carrots by hand is not easy.  Otherwise, the rest of the recipe is just layering in an oven proof pot and throwing it in to cook.

FRESH:  The chicken, carrots, rice all pretty much taste the same (bland).  The prunes come through with their sweetness.  I added the cinnamon sticks to boost the flavor a little, which you could taste.  It feels like it still needs something.  I would do a squeeze of lemon and maybe some chopped up cilantro.  Maybe a touch of heat (cayenne)? 

OVERALL:  I won't be making this again.  Yes, it's super easy, but its super blah.  I've become more adventurous in my tastes and this is like a ride on the kiddie train at the fair....perfect for the kids, not for adults.  Bon Apetite, I'm chalking this one up in the FAIL column.

Tomrrow is a twist on coleslaw.  See ya then!

Sunday, March 28, 2010

March 27 & 28 - Chocolate Macaroons

Coming Down With Something...
I think I'm getting sick, which sucks.  I'm not sure who I got it from, but I can feel it starting to sneak into me.  This could explain my lack of energy all day yesterday (or it could be laziness).   But I'm getting some flemminess.  Ugh.  Why this week?    Since I was playing shut in yesterday, I don't have any good stories....sorry. 

THE RECIPE

Ingredients: 
Chocolate: $2.29
Egg whites: had
Salt: had
Sugar: had
Vanilla extract: had
Coconut: $1.89

Total: $4.18

I have to say, I have never made a chocolate coconut macaroon before.  Sure, I've made the regular coconut ones, but chocolate??  My first thought was, is this going to work?  My second was, how many can I eat before getting sick?

Obviously, from the picture, these cookies did turn out.  I'm kind of amazed by them.  They've got an outside meringue crunchiness and an inside of a chewy brownie.   They're pretty good.

THE RESULTS

FAST:  Prep took a little while with the melting of the chocolate and the beating of the egg whites. (About 20 minutes).  Add another 20 minutes of cooking time, 10 min  for the cookies to cool and you can have these cookies done and in your mouth in about 50 minutes.

EASY:  I'm going to have to say moderate difficulty.  The microwaving of the chocolate was pretty easy, just make sure to put the chocolate in a clean DRY bowl and use a clean DRY spoon.  If you get any water into your chocolate, it will seize up and make this recipe near impossible.  The beating of the egg whites can be a little intimidating.  Make sure you don't over beat them.  MY TRICK: When they get thick and glossy, turn the bowl upside down, if things start to slip out, beat some more.  If the whites don't move while they're upside down, they're ready.  Also, make sure you fold very carefully, you do not want to overfold and deflate your egg whites.

FRESH:  The take on the recipe is pretty fresh.  The cookies themselves taste like chocolate and coconut.  No real crisp, clean flavors.

OVERALL:  Its a pretty good recipe.  I'd like to play around with it again sometime to experiment.  Brian likes black forest, so I want to see if I can maybe throw some dried cherries or cherry extract into the mix.  Maybe cut some of the coconut?  Also, I was thinking of cutting the coconut into smaller pieces.  Maybe add another egg white?   So many possibilities, so little time.

Okay...Monday I am OFF and then we start Easter week.  My first easter in a long time not at a restaurant.  It's going to be exciting.  I can finally enjoy this holiday!  Tuesday is a chicken recipe.   See ya then!

Friday, March 26, 2010

March 26th - Warm Spinach Parmesan Dip

EXHAUSTION
I'm so terribly sorry, but I am so exhausted right now.  I got home from being at school in Chicago all day (since 5:30 a.m.) and I'm beat.  (We had our annual symposium today...which I'll talk more about some other time).   I could gush on for hours and hours about this recipe...it's really that good!!...but I just physically can't.  It's hard to even put words together to form sentences, let alone type.

THE RECIPE

Ingredients:
Butter: had
Olive oil: had
Onion: $0.69
Garlic: $0.79
Flour: had
Chicken broth: $1.89
Whipping cream: $1.39
Spinach $1.25
Parmesan cheese $3.08
Sour cream: had
Cayenne: had

Total: $9.09

THE RESULTS

FAST: This took me about 20 minutes with all the chopping and cooking I was doing. 

EASY:  Really simple.  The gradually beating in the chicken stock is the hardest part.

FRESH:  Quite fresh...don't try to substitute frozen spinach!

OVERALL:   Make sure to chop up your spinach...I didn't as much as I should.  It doesn't have to be fine, but the bigger the leaves, the chunkier the spinach pieces in your dip (which can get messy).  You can omit the cayenne if you want.  Really, this dip is one of the better recipes in this series.  I wish I wasn't so tired so I could sing it's praises.  You really need to keep this recipe and try it for company...it's easy and impressive.

Okay.  It's off to sleepy time.  Chocolate macaroons are up for the weekend.  See ya tomorrow...or Sunday depending if I don't get out of bed tomorrow!

Thursday, March 25, 2010

March 25th - Fried Eggs on Toast with Pepper Jack and Avocado

Cake, Cake, and More Cake...
Well, today I get to spend most of the day in the city putting together sheet cakes for our school's culinary symposium (which is tomorrow).  I won't bore you with the details of that, but I will mention that I am in charge of the cake competition.  The students are putting together three tier-ed cakes with a Chicago theme.  They've had 2 1/2 weeks to do it at home and today is the entry deadline, so I will be taking all of their cakes in today.  I'm excited to see what they'll look like.   Enough talk, let's get to the craziness...

THE RECIPE

Ingredients:
Butter: had
Eggs: had
Montery Jack Cheese: $1.10
Bread: $1.89
Avocadoes: $1.19
Cilantro: had

Total: $4.18

Reading this recipe astonished me.  First, because I wouldn't expect something like this from Bon Appetit.  Second, I wouldn't consider this a main meal (which is what Thursdays are supposed to be according to this calendar).  I mean, I like the creativity involved with this, but I feel like someone was one recipe short of getting a book published and threw something in very last minute.  I don't get it.  Meh...that's my opinion.  I still have to make it and eat it..so here we go.

THE RESULTS

FAST:  Really quick.  I toasted the bread in the broiler while the eggs were cooking (about 2 minutes), then threw the eggs on the bread, then the cheese, put it back in the broiler, and let the cheese melt (about another 2 minutes).  Sliced an avocado and chopped some cilantro (another 2 minutes) and done.  About 6 minutes all together.

EASY:  Very.  See above.

FRESH:  I love fresh avocado.  And the chopped cilantro was a nice touch too. 

OVERALL:  This was okay.  It was much better when I put hot sauce on it.  You know, if you made a spicy hollandiase sauce (or even did a salas), this has the makings of a southwestern Eggs Benedict (add some fried chorizo).  

Spinach dip tomorrow...see ya then!

Wednesday, March 24, 2010

March 24th - Garlic and Olive Oil Smashed Yukon Gold Potatoes

FINALLY FINISHING....
I am on page 883 of my 1007 page book...woo hoo!  I will finish this sucker up today.  For the past six weeks (god it feels like forever), I have been reading this book "Jonathan Strange & Mr. Norrell".  I have renewed this book twice now because it has been taking me so long.  I'm not able to renew it anymore and I've got 2 days left to finish it up.  Don't get me wrong, it's a really good book, I just haven't had time to read it.  You're probably asking yourself, why not just get the book on CD like you've have?  Well, I decided I needed to do this to show myself that I'm not lazy.   It was a challenge to myself (just like this blog).

So later on today, I will be doing a little happy dance as I complete this book.  And honestly, the printing is WAY TOO SMALL for a paperback novel so I'll be glad it's done.  (God, I feel like an old man).  Before you start ribbing me on joining AARP, I've shown this book to a handful of different people and they agree with me.  Plus, there are these really annoying footnotes which are printed even smaller! 

Goodbye Jonathan Strange & Mr. Norrell, you've been in my life a little too long.  (P.S. I highly recommend reading this book...only, get it on CD). 
THE RECIPE

Ingredients:
Yukon Gold potatoes: $2.49
Olive oil: had
Garlic cloves: had
Thyme: $1.89

Total: $4.38

Steaming potatoes to make mashed potatoes is something I learned last Thanksgiving from Brian.  He found this recipe on America's Test Kitchen about the best mashed potatoes ever.  They recommend steaming the potatoes rather than boiling them to retain the fluffiness of the potatoes.  I was skeptical, but became instantly hooked. 

This recipe follows the same logic.  They tell you to leave the skins on the potatoes (which I don't mind), but make sure you scrub them really well under water, cut them in wedges and steam them.  The timing is a little off (it took me a little longer to get them done than 15 minutes).   They mash up beautifully and the olive oil just takes to them wonderfully (also, it gives them a nice golden color).  I scaled back the recipe and only put in 3 small cloves of garlic.  (I've been reeking of garlic recently...don't ask).  Viola!  Some of the best mashed potatoes I've had since Thanksgiving.

THE RESULTS

FAST: You don't need to peel the potatoes, so that saves you some time.  The potatotes took longer than 15 minutes for me to steam.  It was more like 20 to 25 minutes (I blame it on my stove).  The garlic needs to saute on real low for 6 minutes, otherwise you'll end up burning it (and there is no way to cover up the taste of burnt garlic).  All together, this took about 35 minutes from start to finish.  Not too bad.

EASY:  Again, you're not peeling potatoes, so this recipe is pretty basic.  Steam the potatotes, saute up some garlic and then mash with a sprinkling of thyme. 

FRESH:  The thyme really adds to this recipe.  I also like the fact that you can actually taste the potatoes.  They aren't hidden by globs of butter or sour cream. 

OVERALL:  I will always make my mashed pototoes this way.  Substituting the olive oil for the butter just brings the potatoes to life.  I don't like my garlic mashed too garlicky, so I will probably just put 1 clove in next time.  Also, I plan on growing thyme this summer, so that will be on hand and have much more pep than store bought thyme.

We've got an odd recipe for tomorrow.  It doesn't really fit in with what we've been making since Jan. 1st (I think its not up to snuff for Bon Appetit)...but it's part of the project and it needs to be made.   See ya tomorrow!

Tuesday, March 23, 2010

March 23rd - Spiced Pork Tenderloin

JUST ANOTHER MANIC MONDAY....
I have come to the realization that the path of my life will never be easy.   I'm not one of those lucky people who are blessed with good fortune everywhere they go.  You know the type.  They're always winning something or getting something for free or know someone who knows someone and "poof" they're a CEO.   I will forever be on the twisty path of life with the roadblocks and stumbling points.  I will have to work hard for everything that I want.  Things can never just go simply.  There are always complications. 

Whether it's busting open loaves of bread because I thought I could throw it into my shopping cart (but it hits the side and the bag breaks and bread goes everywhere), or finishing baking cakes at school and keeping my chef jacket clean (but then spilling coffee on it when I go to check my e-mail), my days are always filled with that extra step.  It's that extra something that always has to happen to zing me.  (Forgot to mention cooking at home, opened a cabinet, and having a stupid shot glass fall, bounce twice, and THEN break, right as I'm ready to plate it up).   

That all happened yesterday (plus add 2 paper cuts and Target messing up the printing of my pictures).  I wonder what will happen today? 

THE RECIPE

Ingredients:
Olive oil: had
Garlic: had
Cumin: had
Cinnamon: had
Ground clovers: had
Pork tenderloin: $6.10
Chicken broth: $1.79
Cilantro: $0.49

Total: $8.38

THE RESULTS:

FAST:  Not bad. The pork took a little longer than 20 minutes to cook (about 25).  The whole recipe took about 35 minutes from start to finish.

EASY:  Very.  You can actually marinate the pork ahead of time which will give it a better flavor.  The deglazing of the pan and the making of the sauce is a bit involved (a word of advice...make sure you don't burn yourself on the hot pan).

FRESH:  The cilantro gives it a kick of freshness.  Don't skip it...you'll need it. Otherwise, the "spiced" part of the tenderloin is a little one-dimensional.

OVERALL:  Brian really liked this recipe.  My problem with it is that it's sort of blah (lackluster if you will).  The deglazing the pan and making the sauce isn't worth the extra trouble.  I'd rather just make some sort of sauce seperately to go with the pork (which I think it definitely needs).  I think a really good, warm, roasted tomatillo salsa would be a perfect match for the cumin/cinnamon/clove flavor of the pork.

Mashed potatoes is next...See ya tomorrow!

Sunday, March 21, 2010

March 20 & 21 - Pineapple Coconut Pie

On Location...
So this blog is actually on location in Milwaukee as we are visiting my family!  (I decided to bring the pie fixings with me so they could partake in this project as well.)  The last time I've seen my family was Christmas, so I thought this would be a great weekend to trek up to Wisconsin and do a vistit.   Nothing too intensive, just a low-key/mellow few days of hanging out with the nephews.   


Joey deciding to do a spa treatment with his yogurt.


THE RECIPE

Ingredients:

Pie crust: $2.19
Pineapple: $3.00
Sugar: had
Flour: had
Salt: had
Eggs: had
Butter: had
Coconut: had
Macadamia nuts: had

Total $5.19

I cheated this week (well, not according to the recipe) and bought a pre-made pie crust.  I hate doing it because of all the un-natural ingredients, but I needed something that could travel.

THE RESULTS

FAST:  Not really.  The make-up will take you about 15 minutes, the baking an hour 15 minutes, and cool-down another hour.  (I recommend making this pie the day before to really let the custard set.)

EASY:  Yes, especially if you buy an already made pie crust.  The tricky part may be cutting a fresh pineapple.  You can find already cut fresh pineapple in your produce department.  It's a little more expensive because of the labor involved, but it saves you some time.  (I'll post some pictures on how to easily cut a pineapple the next time I make this pie...which will be very soon). 

FRESH:  Most definitely.  There is a difference between using fresh pineapple and canned.  I recommend the fresh (so you don't have to worry about excess moisture making the crust soggy).

OVERALL:  This is a great pie.  I'm surprised I haven't seen a pineapple custard pie recipe before.  Now, the picture does not do it justice (because it was taken in my parent's laundry room), but this pie came out looking spectacular.  My family couldn't wait to eat this pie, so we cut into it while it was still warm.  It was good, but I'd like to try it again cooled off and set.   This will be another keeper recipe which I really recommend you should try. 

Monday is tip day and I'll be spending most of the day making a sheet cake at school for our upcoming symposium.   Our next recipe will be pork tenderloin...yummy!  See ya Tuesday!

Friday, March 19, 2010

March 19th - Meyer Lemon Cosmopolitan

It Can't Come Quickly Enough...
Finally, the weekend is here!  But, unfortunately, this is the last day of the nice weather here in Chicago-land for the next couple of days.  The clouds are already rolling in.   This week has been pretty blah for me so this grey weather coming is a great way to finish it off.  And, just in time, it's cocktail day! (ROUND OF APPLAUSE)  I'm going to savor this.  Next week is going to be a busy one for me.  But, let's not think of that.  Instead, lets think happy yellow thoughts like the color of this wonderful martini.

THE RECIPE

Ingredients:

White Cranberry Juice: $3.49
Vodka: had (come on I'm Polish, I always have vodka)
Sweet & Sour Mix: $2.49
Meyer Lemon Juice: $3.29

Total: $9.27

THE RESULTS

FAST:  I'm no Tom Cruise in Cocktail, but I can manage to throw this together in at least 5 minutes.

EASY:  Like a Sunday morning.

FRESH:  Lemon fresh. 

Overall:  I like that they call it a meyer lemon cosmopolitan, but they really should call this a lemon drop martini.  Essentially, that's what this looks and tastes like.  I can get a little of the cranberry, but the major flavor is lemon.  Don't get me wrong, in either case this is DELICIOUS!   I'm just saying if it looks like a duck and quacks like a duck....

Tomorrow is a pie that I've never made before.  I'm really looking forward to it.  See ya tomorrow!

Thursday, March 18, 2010

March 18th - Turkey and Pinto Bean Chili


After a crazy St. Patty's day, it's nice to just have a mellow day of not doing very much of anything.  I've got some grading and misc. school prep work to do, but I plan on enjoying the nice weather outside with a book (and some chili). 

THE RECIPE

Ingredients:
Onion: $0.35
Red Bell Pepper: $1.29
Garlic: $0.79
Turkey: $5.25
Chili powder, cumin, oregano: had
Pinto beans: $2.97
Diced Tomatoes: $0.99
Chicken broth: $1.89
Chocolate: had

Total: $13.53

I am in absolute love with this chili powder (Merken Mapuche Spice produced by Chileangourmet).  It is from Chile and made from the cacho de cabra (horn of the goat) chili and has a marvelous smoked flavor.  I bought it a while ago at Williams Sonoma, but sadly, they no longer carry it.  So, I've been saving for special recipes (especially chili).  Although I only have maybe a tablespoon and a half left, I decided to pep up this recipe with it. 


SNOBBY CHEF ALERT:  Chili is only as good as the chili powder you put in it.  Yes, that's a snobby chef thing to say, but it's true.  If you buy an inexpensive chili powder in a paper packet, your chili is not going to garner the complex flavors it truly deserves.  Am I proposing to buy a very expensive chili powder that costs $20 for one ounce?  Absolutely not.  I just want you to be aware that not all chili powders are created equal.  And since this is the main flavoring of chili, you may want to be a little more experimental to other varieties than just the run of the mill.  If you're truly daring, you can always make your own!

THE RESULTS

FAST:  Nope.  Took about an hour and a half to make this from start to finish.  (Plus, chili is always better the next day.  So, if you consider that, this is actually a recipe that takes 1.5 hours + 1 day.)  Prep takes about 10 minutes to chop everything up (if your not constantly interrupted) and cooking will take about an hour and twenty minutes. 

EASY:  Pretty much.  If you have a crappy can opener, opening the cans could be the most difficult part of this recipe.  Otherwise, it's the chopping that'll be the most complicated step.

FRESH:  Yes, it's pretty fresh.  Again, your chili will only be as good as your chili powder.  If it's old and stale, your chili will be dull and unflavorful.  I'd love a dollop of sour cream and maybe a little chopped cilantro.

OVERALL:  It's your typical chili recipe made with ground turkey.  The chocolate darkens the flavor of the chili, but it's not very pronounced.  (No one would be able to distinguish it in the chili unless you told them).  Its a pretty "meh" recipe.  I've had better (and worse).   Not a keeper, sorry Bon Appetit.

Guess what tomorrow is?  It's my favorite time again...cocktail time!  See ya tomorrow!

Wednesday, March 17, 2010

March 17th - White Soda Bread


Top o' the Mornin' to You...
I have had the weirdest St. Patty's Day so far.  First, on my way to school, I saw a man riding a unicycle in a mall parking lot.  At first I was like, is he riding a unicycle?  Then, as I was watching him, because I was stuck at a stop sign, I noticed how difficult riding a unicycle looked.  I think he could have walked faster than they way he was tooling around on that thing.  Why wouldn't he just ride a bike?  It would be faster...I dunno.

Second, I had to stop and get some gas.  So I went in to pay, because the credit card reader at the pump wasn't working (go figure).  When I got inside, there was a husband and wife arguing really loud in Polish.  Since I grew up hearing my parents fight in Polish, I had a good understanding of what they were saying...and it really wasn't very nice.  All of a sudden the guy behing the counter goes "I don't know what you two are saying, but you need to take it outside".  He looks at me like 'get a load of those two' and I just quickly pay and get the heck out of there.

Finally, I get to school and am really looking forward to the corned beef sandwiches they have been advertising for the past two weeks.  Turns out, there's no corned beef.  Someone got roast beef instead. 


THE RECIPE

Ingredients:

Flour: had
Caraway seeds: had
Baking soda: had
Salt: had
Buttermilk: $0.99

Total $0.99

I decided to throw some currants into the dough after I heard a conversation yesterday that Irish Soda Bread isn't good without some raisins in it.  Knowing my absolute disgust for raisins, you can pardon me for throwing in the currants instead.  I'm kind of glad I did.

THE RESULTS:

FAST:  The make up of this dough is very quick.  Maybe 5 minutes max.  Also, the cooking time says 35 minutes, but it only took 30.  So you can be eating a nice loaf of Soda Bread in as little as 45 minutes.

EASY:  Probably one of the easiest breads I have ever made.

FRESH:  The taste of the caraway seed is nice, but could get a little overpowering.  That's why I'm glad I tossed in the currants.  The little bits of sweet are a nice counterbalance.

OVERALL:  The bread turned out super fluffy, moist, and has a great crust.  I would definitely leave out the caraway seed next time and stick with maybe citrus and currants.  I'll be keeping this recipe.  It's quick and good.

Tomorrow is Turkey Chili.  Yummy.  I've been craving chili for a while now.  See ya tomorrow.

Tuesday, March 16, 2010

March 16th - Salmon with Mustard and Brown Sugar Glaze


WARNING: GRAPHIC ANIMAL PICTURES FOLLOW
(If you're vegetarian, you may want to skip this!)
As you know, this weekend my chef friend Tommy and I went to the Family Farmed Expo.  It was really a motivating experience that made us want to cook with farm fresh ingredients.  So, on the way home, Tommy came up with the idea of making head cheese.  At first, I was a little apprehensive.  Not about the head cheese itself, but of the process.  Growing up Polish, I am accustomed to eating head cheese (which I actually enjoy).  I knew the process would end up stinking up the house and I didn't want Brian to get upset (which, of course, he did).  Luckily, Tommy is very adventurous and convinced me that this would be a good learning experience.  As a chef, you always want to experiment and try new things.  So, I thought, why the heck not.  And here, my friends is my head cheese adventure from this past weekend:

STEP #1:  FIND A PIG'S HEAD
This actually was a lot easier than I thought it would be.  I guess you have to know where to look.  As it so happens, Tommy is quite familiar with where to procure a pig's head.  So, we went out to this old school butcher shop near the Illinois/Indiana border.  We ended up buying a 12 lb pig head for $0.59 a pound.  Total cost was a little over $6.  We took home our head in a bag and went back to my kitchen.  We proceded to unwrap it and lay it out on the counter.  Then we thought, oh man, what are we getting ourselves into!


STEP #2:  FIND A RECIPE
Having the pig's head on the counter and looking at each other like "what do we do next", we realized that neither of us knew how to procede.  I decided to scan the vast library of cookbooks I had, but found no head cheese recipe.  We then decided to Google head cheese and found only a handful of recipes using an actual pig's head.  (Most recipes just use assorted pig parts).  I can't for the life of me find the recipe we ended up using, but the videos and recipes all had the same first step, which (to this day) is the oddest thing I ever saw in a kitchen.

STEP #3:  SHAVE YOUR PIG
Apparently you either need to burn off or shave off any remaining pig bristles the butcher may have left on.  Since I didn't want the smell of burning hair in my kitchen, I got out the disposable razor and let Tommy have all the fun. 

STEP #4: SOAK YOUR PIG
You then need to soak your pig head in a brine for at least 5 hours to overnight.  This draws out all of the remaining blood from the pig.  We made a flavorful bath and set the pig head outside (luckily it was very cold) to rest overnight. (Note: I finally got to bust out this 8 gallon stock pot that had been sitting in the garage for years.  I bought it super cheap on sale at Williams-Sonoma, but never found a use for it...until this weekend)

STEP #5: BOIL YOUR PIG
The next morning (Sunday), I got up super early, 5:00 a.m., to begin the stinky process of boiling the head.  It takes at least 5 hours for it to boil.  Since I was using a super huge stock pot on my not so great stove, I figured it would take at least an hour for the head to come to a boil.  So once I put it on the stove and opened the kitchen window, I went back to sleep. 

STEP #6 PICK THROUGH YOUR HEAD
Once the head was done boiling, you need to take it out of the "stock" and let it cool down enough to pick through all the miscellaneous stuff to get to the meat.  (At this point Tommy came back over to my house).  I'll leave out all the graphic details, but there really isn't a whole lot of meat in the head.  We measured out 1.5 lbs of meat from our foraging.  While we were doing that, we let the liquid cook down with the pigs ears to develop the gelatin which will hold the whole thing together.  This was the most time consuming part of the process.  NOTE: If you don't let it cook down long enough, your "stock" won't have enough congealing factor to make the head cheesefirm enough to cut.  You want it to be as firm as a Jello Jigglers recipe. 
STEP #7 LAYER YOUR PIG PARTS AND LET IT REST
Finally, after hours of cooking down, we were able to line a loaf pan with plastic wrap, put down our meat, and cover it with our gelatinized stock.  We then let it sit in the fridge to firm up over night.  (Tommy took his home to congeal).

STEP #8 ENJOY YOUR PIG JELLO
Once the head cheese sets and you scrape off the layer of fat that collected at the top, it's time to enjoy the fruits of your labor.  I actually didn't mind it.  It needed more salt and a little more flavor, but it was pretty god.  It's actually the best head cheese I've ever made. 

STEP #9 REFLECT ON A FULL BELLY
Would I ever make head cheese again?  No, probably not.  It took the entire weekend and smelled up my kitchen.  (Luckily the stink is gone now).  But, I can say that I've made head cheese now and like Brian says, I can cross it off my bucket list.  As a chef, it was interesting to see the whole process from start to finish, but I think I'll stick to just buying it at the Polish deli.

The Recipe

Ingredients:
White Wine: $4.99
Butter: had
Old Bay: $3.99
Salmon Fillet: $7.05 (See Note)
Spicy Brown Mustard: $2.19
Brown Sugar: had

Total: $18.22

Being in an experimental mood on Monday, I decided to forgo the salmon and use shark steaks instead.  (It was the same price as two salmon fillets.) I've never had shark before and thought it would be a great alternative.  Plus, I like feeding Brian new things.

THE RESULTS

FAST:  This recipe took me 25 minutes from start to finish.  The fish takes 15 minutes to cook in the oven and another 3 to broil.  Prep will take you about 6 minutes to do the cooking liquid and to measure everything out.

EASY:  As always, this recipe was super easy.  There really was nothing hard about the process.

FRESH:  Surprisingly yes.  The white wine and Old Bay seasoning really pepped up the flavors.

OVERALL:  I think I like shark.  It's a really meaty fish (reminds me of ahi tuna) that had no fishy taste what-so-ever.  Brian enjoyed it as well.  I would have given the fish a squeeze of fresh lemon juice, but otherwise it's a good, simple recipe.  No changes needed.  (I suppose you could use dijon mustard if you didn't have spicy brown). 

Well, I'm all blogged out.  Tomorrow is St. Patty's day and we've got a Irish Soda Bread recipe.  See ya tomorrow!

Saturday, March 13, 2010

March 13 & 14 - Lemon Shortbread

The Man Himself...
Went back to the Family Farmed Expo today to see Rick Bayless do a cooking demo.  He seems like such a great chef (I've never had the experience of eating at Frontera...I must be the only Chicagoan who hasn't).   He is so passionate about using fresh, local produce and about helping the American farmer that he makes you excited and enthusiastic to take up the cause.  Also, I didn't realize that he formed the Frontera Foundation which gives grants to farmers in need of supplies and equipment to expand their businesses.  

He made a simple potato and poblano soup topped with Chorizo, cilantro, and cheese..nothing fancy.  It was pretty interesting to hear his take on food and the household tips he shared with all of us.  And there were a lot of us there.  Luckily my friend Tommy and I got there a little early to grab a seat.  There must have been a hundred people sitting and about fifty more people standing around.  This guy can really attract a crowd.  As much as I think he is talented, I didn't swoon over him like some of the people did around me.  Jeeze, you'd think by the way these people were talking he was the second coming of Christ.  I don't get enamored with famous people.  Yeah, it's cool to see them, but I don't need to bust out my phone and start taking pictures from the back row.   "You see this little dot right there...yeah, that's Rick Bayless.  YES THE RICK BAYLESS!  OMG Could you vomit?  He is a genius.  No not a genius, he is a culinary god!"  Settle down people, it's food.  Mark my words, if I ever become a celebrity chef, I will never complain about the way the demo kitchen is set up.  And, I will take time to personally talk to everyone...except for the scary looking people who want a lock of hair. 

The Recipe

Ingredients:
Flour: had
Sugar: had
Cornstarch: had
Lemon: $0.33
Salt: had
Butter: had

Total: $.33

Honestly, I was really worried about this recipe turning out.  It (the "dough") looked way too dry.  I love in the description that it says "the secret to tender shortbread is to avoid overworking the dough".   Umm, I basically had crumbs that I was trying really hard to press into the pan and hope to god they'd stay together.  There is no way to NOT overwork this "dough".  We'll see what happens.

THE RESULTS:

Fast:  Yeah.  It only takes about 5 minutes total to get this prepped out and into the oven.  The cooking time, however, should only be 30 minutes and not 40.  I pulled it at 30 minutes because it looked golden brown and had a really strong baking smell (it was to the point that if I would leave it in longer, the bottom would burn.

Easy:  Basically you're skipping the traditional hand cut-in method and using a food processor.  The prep really couldn't be easier.  The pressing into the pan was a little difficult because it really wasn't a true "dough".

Fresh:  It's lemon shortbread.  Tastes like a crumbly lemon cookie.  Fresh?  I'd say no.  If you disagree, then make it and let me know.  (Can you tell this is a tender spot for me?)

Overall: Well, it worked.  I was suprised it held together.  It actually is a quite simple and, surprisingly, a quite good recipe.  I'd like to do an orange-rosemary shortbread next time.  I think that would be wonderful.  Some orange zest and a little chopped up fresh rosemary.  It would be a different take on an otherwise boring cookie.   (Also, I dusted the top with powdered sugar to make the picture a little more exciting.  No, that isn't flour.)

My friend Tommy and I are working on a chef experiment.  I won't give it away, but I should be ready to post it on Tuesday.  It's going to take all weekend to do.  Did I pique your interest?  See ya Tuesday!

Friday, March 12, 2010

March 12th - Parsley Hummus with Cauliflower Crudites

THE 3/50 PROJECT
So today at this Family Farmed Expo, I heard a little bit about this 3/50 project and was quite intrigued.  (I have always tried to support local businesses whenever possible.)   I decided to look it up online and wanted to share the information with you. From their website:

3
What 3 independently owned businesses would you miss if they disappeared?  Stop in. Say hello. Pick up something that brings a smile.  Your purchases are what keeps those businesses around.

50
If half the employed population would spend $50 each month in locally owned independent businesses, it would generate more than $42.6 billion in revenue.  Imagine the positive impact if 3/4 the employed population did that!

68
For every $100 spent in locally owned independent stores, $68 returns to the community through taxes, payroll, and other expenditures.  If you spend that in a national chain, only $43 stays here.  Spend it online, and nothing comes home!

1
The number of people it takes to start the trend...you.

Please visit http://www.the350project.net/ and support your local mom & pop restaurants!

The Recipe
Ingredients:
Parsley: $0.59
Garlic: had
Garbanzo beans: $1.29
Sour Cream: $2.29
Tahini: $1.49
Sesame Oil: had
Lemon: $0.33
Cumin: had
Salt: had
Cayenne: had
Cauliflower: $1.59

Total: $7.58

WARNING: Do not put as much salt as it says.  I don't know what happened...I only put in 1 1/2 teaspoons...but the dip is WAY too salty!   I'm going to have to throw it away it's so bad!  The tahini only has 5 mg of salt, so that's not the problem.   And I KNOW that I used teaspoons and not tablespoons!  Otherwise, it would have been so tasty!

THE RESULTS

Fast:  The hummus will take you maybe 3 minutes to make.  The cauliflower will take about 6 minutes to do.   So you're looking at getting this all done in maybe 10 minutes.

Easy:  The hardest part of this recipe is the cauliflower.  Otherwise, it's just putting all the dip ingredients in a food processor and pureeing it all.

Fresh:  This would have been a good hummus if not for the saltiness of it.  I actually like the zing of lemon and the heat of they cayenne.  The parsley helps battle the sesame-ness of the hummus (which sometimes can be a bit overpowering for my palate).

Overall:  I would maybe make this again and omit putting in the salt all together.  I have no idea how that happened.  It could be because I used iodized salt because I ran out of kosher.  Iodized to me is almost too salty (if that's possible) to use, but I had nothing else.  Dang, I should have just left it out!!!

Well, tomorrow is Lemon Shortbread.  I feel like I've made shortbread already?   Hmmm... I'll have to go back through the recipes and see.  Would it have been the Chai cookies?  Could be...  See ya tomorrow!

SUPPORT MOM & POP RESTAURANTS

Thursday, March 11, 2010

March 11th - Baked Rigatoni with Ham, Tomatoes, & Feta Cheese

Food Nerd On The Loose...
Heading to the Family Farmed Expo tomorrow (and Saturday) to research local and sustainable food.  I know, it sounds really nerdy, but it really is quite interesting.  I'm all about supporting local farmers and being wary of the industrialization of food.  This is the future of food in our country; so, I suppose now is a good time than any to learn more about it.   Always the constant (overacheiving) student...

Kind of tired from being at school all day yesterday, so I'm going to go right into the recipe.

THE RECIPE:
Ingredients:
Rigatoni: $1.19
Tomatoes: $1.79
Feta Cheese: $1.08
Mozzarella: $1.50
Thyme: Had
Whipping Cream: $1.89

Total: $7.45

Wow.  This totally made a lot.  Brian and I are going to be eating pasta for days with this one.  Again, if the deli section of grocery store sells Feta cheese, I'd buy it there rather than the prepackaged stuff.  One, it's a little cheaper.  Two, it won't be packed with preservatives.  Also, for anyone lactose intolerant like myself, I'd skip the whipping cream and add some chicken (or vegetable) broth instead.  There's enough dairy with the two cheeses without adding a cup of cream.  Thank god for Lact-Aid!

THE RESULTS:

Fast:  Upon first inspection of the recipe, you'd think maybe...could be kind of quick.  But, I didn't take into consideration the cooking of the pasta (including the time it takes for the water to boil).  So, you're looking at about 1 hour 15 minutes to get this whole thing done from start to table. 

Easy:  Although the recipe is pretty long (compared to the others thus far), it is really quite simple.  Cooking the pasta is the hardest part.  Once that's done, it's chop up some stuff, toss together, and bake.

Fresh:  It could be much fresher with some fresh herbs.  The dried thyme was okay, I would have liked some fresh basil, especially with the tomatoes and cheese.  Fresh parsley would help boost this recipe up a bit too.  A small squeeze of lemon will cut through all the dairy and perk up the pasta.

Overall:  This is a good throw together recipe.  I like it because you can use it as a basic plan to help develop some creativity in the kitchen.   I'd substitute chicken or go all veggie the next time.  The ham is okay (very classic ham and cheese taste).  I would give this recipe a veggie boost by adding zucchini, eggplant, or maybe even some kale or collard greens.   Fresh basil is a must next time and I'd also scale back the tomatoes to 2 or 3.

Well folks, tomorrow is an old favorite.... hummus.  I think I made that stuff like six times throughout my culinary school training.  This recipe has a little different spin to it, sounds interesting.  See ya tomorrow!

Wednesday, March 10, 2010

March 10th - Thai Cucumber Salad with Roasted Peanuts

The Other Side...
Like I was saying yesterday, one of the first kitchens I ever worked in was this small family owned Italian restaurant.  The owner wanted me to come in for a "test run"...meaning, I would have to come in and cook for him to see if my skills were up to par.  In researching this restaurant, I noticed that there were some stories on the internet of this site being haunted.  Interesting...  Apparently the restaurant used to be a brothel owned by Al Capone (at least that's how the stories go).  According to internet lore, there were a lot of unexplained events that took place over the years as the site changed hands from owner to owner.

 I decided not to think anymore of it then just some wierd stories that may or may not be true.  I wasn't a big believer in ghosts.  So, I went to the "interview", really nervous, and they wanted me to make none other than chicken vesuvio and some other pasta dish.  They gave me the kitchen, some ingredients, and told me to go at it.   There were only 3 people in the whole restaurant (it hadn't opened yet) beside myself there and they all decided to hang out in the dining room.  The kitchen was very small with only 1 entrance/exit which if you stepped into, you'd be right in the middle of the line (there would be no missing you). 

The whole time I was in the kitchen, I felt like I was being watched.  I thought maybe the owner had come and gone from the doorway.  I was too busy (and nervous) to pay attention, so I just kept focused on my cooking.  The chicken vesuvio was done and I plated it up (they had given me a big platter for it).  So I left the plated up chicken on the stove top and went to go grab a quart of cream to finish off the pasta dish.  The cooler is what we call in the industry a "reach in".  This one happened to be under the counter only a few steps away from the stove.  I grabbed the cream and turned back to the stove and found that the dish of chicken wasn't there.  At first, I thought, that's wierd, where did it go.  I turned around and it was sitting on counter behind me.  At that moment, I literally had shivers run down my back and my arms felt cold.  I know, that I did not put that dish there. Remembering that I had a time limit to get these dishes done, I didn't have time to think too much about it.  I was freaked out, but needed to continue. 

So, I finshed and brought out the food to the table in the dining room.  We got to eating, they critiqued the food, and we sat around talking.  I nonchalantly asked if they had been in the dining room the entire time, because it felt like someone kept coming in the kitchen watching me.  They all stopped what they were doing and stared at me.  They asked me to elaborate further. I just said, it felt like somebody was watching me.  They asked if anything else happened?  I thought they were pulling a prank now, so I told them about the chicken and they just shook their heads and said I was visited by the "ghosts".  They were serious about not having left the dining room.

So, I pretended stupid and asked about the ghosts.  They told me the whole story about the place belonging to Al Capone at one time and being a brothel.  Apparently there were three.. maybe four... ghosts that haunted the place.  A woman, a child, a man, and "a darkness" (their words) that lived in the attic and was "evil".   (I never really experienced the "darkness", but I did come to have encounters with the other three).  I can tell you I'm no longer a skeptic.  That feeling of coldness and the shivers was something I won't forget. 

Other encounters included the fryer turning itself on (after I turned it off..again, no one in the kitchen).  One time, as I was going into the basement store room, it felt like someone took my elbow and was guiding me (or pushing me) down the stairs.  Again, a very cold creepy feeling came over me.  Lots of things just being re-organized as soon as you turn your back.   I never did see anything or hear anything.  It always just felt like a presence. 

I ended up leaving there (unrelated to the ghosts) only after a few short months.  But, I remember that time and the eerie things that happened there.  It's neat to look back on it now, but at the time it was more of a nuisance then anything. 

THE RECIPE

Ingredients:
Lime Juice: had
Fish Sauce: $1.79
Sugar: had
Jalapeno: $0.33
Garlic: had
Cucumbers $0.99
Red Onion: $0.79
Mint: had
Peanuts: had

Total: $3.90

THE RESULTS

Fast:  This recipe was really quick.  I think it took me 10 minutes total.

Easy:  The hardest part is the chopping.  It's a simple salad, really quite easy.

Fresh:  This is one of those recipes that really has a combination of good ingredients that make it taste uber-fresh.  The mint, cucumbers, lime juice, and jalepeno all work well together for a refreshing salad.

Overall:  I really like this recipe.  Some people may not like the fish sauce.  In that case, take it out and add a little bit of low-sodium soy sauce (less than a Tablespoon).  I actually like the fish sauce in it, it gives a really great Thai flavor.  I would make it a little more spicy by adding some crushed red pepper flakes. 

Tommorrow looks like a great pasta dish!!